Info.
- Easy
- 25 minutes
- For 10 people
- € 1 / person
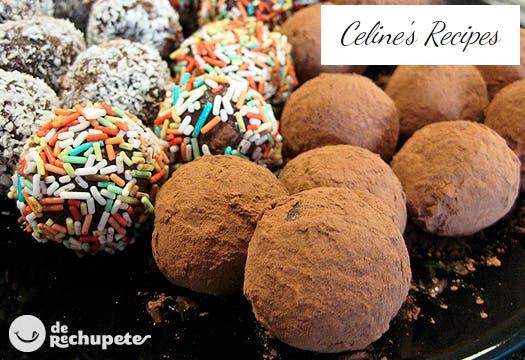
How to prepare chocolate truffles . They say that making any of the dessert recipes on the blog relaxes … I’m sure not all, but it is true that these chocolate truffles do not relax but they are delicious. Any one of you associates a particular dessert with a childhood memory, because for me these truffles are one of them, these chocolate truffles never came whole to the fridge and the kitchen was like a battlefield. Now at home we have many favorite recipes, from chocolate coulant to classic NY-style brownie .
It was strange that, following the same recipe, in each house the truffles were different and the best were always those of my cousin Pati , the secret: the best chocolate with a personal touch based on some liquor or distinguish them with the best decoration. Every time I prepare them again I remember that childish smell or taste that I keep with zeal in memory, do not stop making them with your children since you do not have to use an oven or fire, they are super easy to make and in the future I will They will appreciate it, just like I do now, thanks mom.
On this occasion I offer you two variants: express chocolates and some simple truffles . The first ones with a gourmet touch and a slightly more elaborate technique, although much easier than chocolate mousse . You can use quality chocolates that are already spiced and where the degree of sugar is usually quite low, so that the palate is more adult, you can also include chocolates with different flavorings: orange, chili, salt, strawberries, raspberries, with some fruit Dry hidden inside, Ferrero-style chocolates with their hazelnut in the center and mixed with hazelnut paste … The other option with almost the same ingredients is to make super easy truffles with chocolate , freeze, round and ready. I hope you like them and do them with your children.
Preparation of chocolate truffles
- We choose the chocolate to use, I use 70% cocoa, but if you like it with more power on the market, you have chocolates with up to 99%. If, on the other hand, you prefer them softer, remember that it is necessary to have at least 55% cocoa base because the recipe uses cream that lowers the flavor. Chop the chocolate, the finer it is the better it will melt.
- We heat the chopped chocolate in a bain-marie over low heat, almost lukewarm, without stirring with the rods until we obtain a homogeneous and smooth cream.
- We should not heat the chocolate more than necessary, 3-4 minutes will be enough. We remove from the fire and let it temper. If you do not want to do it in a water bath, you can use the microwave, melting the chocolate in fractions of a minute so that it does not reach a high temperature and does not burn us.
- We boil the cream in a saucepan and when it is hot pour it over the chocolate, mix well integrating the two ingredients.
- Now that we have the base cream or chocolate ganache we have two options:
- We can leave the future truffles in a container and let them cool in the fridge, resting for 3 or 4 hours, after this time we remove the chocolate from the fridge and we can start to shape the truffles with the help of a spoon and hands and decorating at the end.
- Either we put the chocolate in a jar or in a pastry bag and fill it with each hemisphere (you can even add a hazelnut inside). Freeze for one hour, remove from the mold and join with a little melted chocolate at the base of each hemisphere until it forms a small ball. Then we already manipulate by hand and decorate to taste.
- As decoration I advise you to pass them through cocoa powder, chocolate noodles, grated chocolate, coconut powder, crushed nuts … personalize your truffles and then you can put them in curled paper molds or on a tray.
- As a final tip, leave the truffles in the freezer until you consume them in a container with a lid to prevent them from picking up strange odors from the freezer. When we are going to serve them at a dinner or just because, leave them at room temperature two minutes before trying them. Delicious.
Preparation of the ferrero type chocolates
- We prepare the hazelnut paste, we will use hazelnuts already toasted, if the one you have bought is unroasted, it is very easy. We toast as comfortable as possible, well in the oven, so we have to preheat it to 160º C, heat up and down. We spread the hazelnuts on a tray and bake for 20 minutes, stirring occasionally so that they are toasted on all sides.
- The other option is simpler, although there are no equal toasts, but the process is faster, it would be toasting them with a frying pan. We put them on the frying pan in cold and heat to medium temperature, we move them continuously so that they do not burn and when we see that they give off that rich smell of hazelnut oil and they are lightly toasted we remove them. In any of the two types of hazelnut, whether unroasted or toasted, we must remove the remaining skin.
- We pass the hazelnuts to a mincer, the typical one that comes with the mixer and that we all have at home. Chop the hazelnuts for about 5 minutes, so that the hazelnut releases the oil it takes and makes a paste.
- I advise doing a lot (300 g and up) because if we add less, the machine may not catch the hazelnuts with the blades and it won’t turn out well. This pasta is incredible and we can use it for this cream or in numerous desserts.
- When we have the hazelnut paste we can store it in a glass jar and leave it in the fridge, it lasts for weeks, it will not get bad, at most the oil separates from the paste, but you just have to move again to use it.
- We melt the chocolate in the same way as the truffles and mix well with the hazelnut paste. We already have our base of the chocolate, with it we can make truffles, chocolates … whatever we can think of. We place in silicone molds to make special shapes or we do the same manual molding process, to your liking.
- We put them in the fridge, the bonbon at lunchtime has to be cold, thus we avoid that it remains soft.
They can be customized by adding crispy crispies, cereals, cookie powder or cookies. To enjoy the delicious homemade bonbon.
