Info.
- Easy
- 45 minutes
- For 10 people
- 0.4 € / person
- 435kcal per 100g.
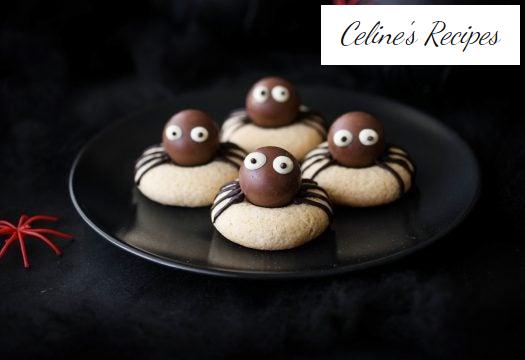
How to make Halloween spider cookies.
It is undeniable that Halloween came to Spain for years to stay and we have fallen into the networks of the most terrifying party of the year.
Among the wide variety of preparations that can be prepared for the occasion, we especially like these spider cookies . Show that cute and cute side of Halloween , which we prefer above any other dessert .
Preparing these cookies is child’s play, who, since we mentioned them, will surely appreciate being involved in the process. They are as easy to prepare with them, like mummy truffles or the already famous mummy sausages .
The cookie dough has no science and, with an adult who supervises the tasks and takes care of the oven, the smallest of the house can be in charge of mixing all the ingredients, making portions of dough and shaping it. A way to spend a fun afternoon with the family.
They are cookies so lucid that they can be prepared as a gift and, if you take them out at the table to accompany the coffee, they will surprise your guests.
In all likelihood the compliments will rain on you, and it will not only be for their appearance but also for how delicious they are. The biscuit-chocolate combination is a guarantee of success and is delicious.
Preparing the base for Halloween spider cookies
- We cut the butter into cubes and mix it with the flour, the salt, the egg and the two types of sugar.
- If we have a kitchen robot the dough will be ready in the blink of an eye, we will only have to mix until homogenized and ready.
- Otherwise we mix the liquid ingredients in a deep and wide container, beating well before incorporating the dry ones.
- We remove and knead until obtaining a homogeneous mass. It takes a little longer, but the process is the same.
- We work the dough on a clean work surface until it is smooth. It is a soft and easy to handle dough, not sticky at all.
- We wrap it in plastic wrap and let it take shape and cool slightly in the fridge. Half an hour will be enough.
Halloween spider cookies shape
- We preheat the oven to 180º C, with heat up and down, and line a couple of trays with vegetable paper.
- We remove the dough from the fridge and divide into 20 portions of the closest possible size. We can use a scale to calculate the exact weight and that they are identical.
- We ball each of the dough portions and place on the baking sheets, leaving some separation between them because they spread slightly with the heat of the oven.
- We crush with the palm of the hand and, with the end of a mortar mallet, a punch or the like.
- We make small holes in the center. We do not have to reach the base, we just have to shape and create the hole in which we will then put the chocolates.
Halloween cookies shape
- Put the trays in the oven and cook for 10 minutes. We remove and review the gap by pressing gently as the dough will be hot.
- We return the trays to the oven and cook 10 minutes more or until the cookies are golden brown, but not excessively.
- We remove from the oven and wait five minutes before transferring the cookies to a rack and cool completely.
Halloween spider cookie decoration
- We melt the dark chocolate and put it in a pastry bag. We do the same with white chocolate.
- We drop a glob of melted dark chocolate in the center of each cookie and place the chocolates on top. It will act as glue and, as soon as the chocolates cool, they will adhere to the cookie.
- To make the eyes, with white chocolate we draw two circles on each bonbon and with dark chocolate we draw the pupils.
- We finish the cookies by drawing the legs, four on each side, with the dark chocolate.
- Let the chocolate cool and harden before serving.
You can see all the photos of the step by step in this recipe album of these Halloween spider cookies .
Tips for perfect Halloween spider cookies
- Spider eyes can be purchased at specialty stores. With this we not only save one step but they are perfect.
- You can also substitute white chocolate for white fondant, we stick them to the chocolates with a little bit of dark chocolate with which we then draw the pupils.
- The cookie dough can be adapted to taste. Vanilla sugar can be replaced by unscented sugar, you can also add cocoa to the dough or use a flavoring (almond, mint, etc).
- The chocolates can be glued to the cookies without using melted chocolate. You just have to put them in their hole when the cookies are still hot (watch out for overheating). The base of the bonbon melts slightly and sticks to the cookie.