Info.
- Easy
- 110 minutes
- For 4 people
- € 5 / person
- 260kcal per 100g.
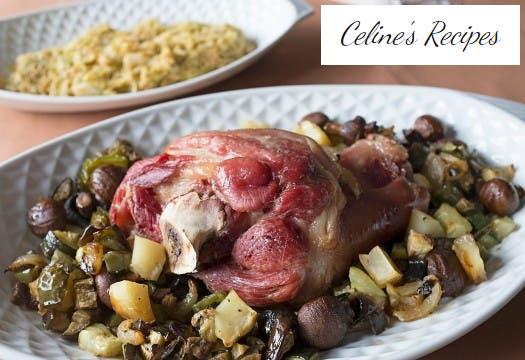
How to make a knuckle in the oven . One of the most tasty and simple meat recipes that you will find on the blog.
The pork knuckle is a part of the pork butcher that goes from the elbow to the hoof. It has a strong flavor, is very aromatic and contains plenty of fat. The fat is located just below the skin so that when it is to be consumed it is easy to remove if you do not want to eat.
The accompaniment is the most healthy and varied, a troop of vegetables made in the oven at low temperature, so that they retain all their flavor and thus the amount of fat is negligible. An ideal and healthy accompaniment for any other dish.
The pork knuckle is one of the dishes that most identified with German cuisine , accompanied by a good mashed potatoes and its famous choucroute or sauerkraut . In this case I have accompanied it with cabbage but braised with paprika, nothing to do with the Germanic preparation.
One of the dishes that are most identified with the knuckle, already in our gastronomy and specifically from my land, is the lacón con grelos , to which the great master Álvaro Cunqueiro refers in his well-known book “A Cociña Galega”.
For its cooking I have chosen to cook it first, helping me with a fast pot to lighten the time, otherwise we will have to have more than two hours. In the end I put it in the oven, so that the result will be a very juicy knuckle; soft on the inside and golden on the outside.
Before starting with the knuckle. Desalinate
- Before cooking we need to desalt the knuckle. The normal thing will be to put it in a container with plenty of cold water 24 hours before cooking it, changing it every 6-8 hours.
- This as estimated time but the ideal will be to read the product label, in case of buying it packaged, and follow the desalting time that it marks on it. Now there are desalted knuckles, ready to cook.
Preparation of the knuckle with vegetables
- After this time we begin the preparation. To do this, we remove it from the water and place it in a pot (we have cooked it in a pressure cooker to shorten the time). Add half an onion, the leek, the peeled carrot, the bay leaf, black peppercorns and rosemary.
- We put it on the fire, close the pot and let it cook for 1 hour. Meanwhile we prepare the vegetables. We wash them perfectly removing all the dirt that they can bring on the surface, since they will cook with the skin.
- Dice the eggplant, the cabacín and the potato and cut the pepper into medium pieces. In a baking dish we add extra virgin olive oil and place the vegetables that we have cut and the whole mushrooms.
- Above we water with a little more oil and season. We introduce the tray in the oven at 165ºC for 30 minutes, so that they are made slowly.
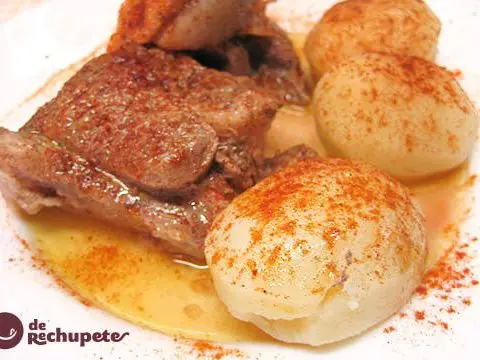
- Once they have finished making the vegetables in the oven and cooking the knuckle, we remove it and place it in the center of the vegetable tray.
Gratin and final presentation of the knuckle
- Strain the cooking broth with a Chinese and use it to water the tray before putting it in the oven in grill mode, at 180º C for 30 minutes.
- On the other hand we clean the cabbage and cut it into julienne strips. We cook it in the rest of the cooking stock of the knuckle, we can even take advantage of it and do it in the fast pot, which will be enough 8 minutes. Once cooked, drain it, removing as much water as possible.
- We put oil in a frying pan and once hot add a teaspoon of paprika from La Vera. Mix well and toss the cabbage well drained. We cook about 10 minutes over low heat and reserve.
- We serve the knuckle accompanied by the vegetables in a source and the sautéed cabbage in another source and consume hot.
- The final appearance of the knuckle has a slight golden crust on the surface. The interior is very juicy but without excessive fat and the vegetables are delicious, they are an unbeatable accompaniment.
You can see all the photos of the step by step in the next album .