
Info.
- Easy
- 45 minutes
- For 6 people
- 0.5 € / person
- 310kcal per 100g.
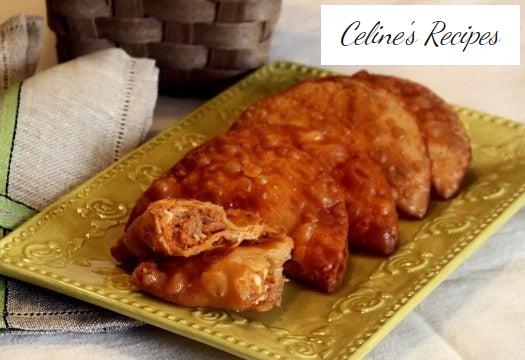
How to make tuna dumplings .
I feel like dumplings , but I’m not going to complicate myself much.
Today I cook tuna dumplings . A simple, quick recipe that succeeds with both the oldest and the youngest.
With the dumplings you can bundle the blanket over your head preparing the dough or buy the ready-made wafers. I prefer to buy the dough and forget about complications.
As the empanadilla is nothing more than a variant of the classic empanada and it is in the latter where I usually use peppers for the filling. In dumplings I usually reduce the content, to be able to recognize flavors well.
Also, being a smaller bite I do not like them to overflow, otherwise they end up breaking and since I like to eat them with my hands, if they are very full it ends up putting everything lost.
The recipe that I propose is just as my mother makes it, but you can modify it to your liking. There are those who add red pepper and green pepper.
I like it as I describe it to you in the “preparation”, perhaps because I have been used to eating it like this since I was little. I hope you like it and prepare it at home.
Preparation of tuna dumplings
- First we are going to cook the eggs, put the eggs in a saucepan and cover them with cold water. We cook them 10 minutes from the boil.
- We should not cook them any longer since a dark greenish halo forms around the yolk that is unpleasant to the eye. With these indications you have to be perfect.
- Let them cool and cut into very small regular pieces and set aside.
- Peel and chop the onion into very small cubes and brown them with a splash of olive oil.
- Drain the oil from the tuna cans very well, pressing with a fork to remove everything.
- Crumble the tuna and, when the onion is browned, add the tuna and the chopped egg.
- We fry well and incorporate the fried tomato, stir well until all the ingredients are integrated.
- We remove it from the pan and let it drain well to remove the oil.
- We open the dough and fill them with the tuna preparation.
- We do not put much quantity so that they can be closed well and do not open when frying.
- We press the ends of the dough well with the fingertips and then we fix it with the fork, giving it the characteristic shape of the pastry.
Frying and final presentation of the tuna dumplings
- To fry them you must make sure that they are tightly closed, this way you will avoid the contents leaking out and the oil filling with remains of the dumplings.
- For frying we are interested in oils with a high smoke point that oxidize (burn) less.
- This depends on the quality of the oil we use, I recommend a mild extra virgin olive oil, for example an arbequina or a seed oil, sunflower, for example.
- These oils will allow us to fry at high temperature resulting in a crispy dumplings and a juicy filling.
- If you have a fryer you can fry them there. If you do not have it, it is better to use sunflower oil to fry them, because you need a lot of it and olive oil would be very expensive.
- When we have the dumplings prepared, heat plenty of oil in a pan and fry them at medium-high temperature.
- It is important that the oil is not very hot when frying, so we avoid burning them.
- We remove and reserve on absorbent paper to release excess oil.
- We serve the hot dumplings as a starter for a meal or as a side dish accompanied by a potato salad simply a mixed salad , perfect for a delicious dinner
To make these empanadas you only need to have the wafers or lids of your favorite brand and the filling is a matter of imagination, in this case the classic tuna , it is just an idea, but you have thousands.
As well as being a quick and easy dish to prepare, it is also a yummy recipe.
One of those “easier impossible” recipes for when you do not know what to prepare for a dinner for the little ones, they will not leave even the crumbs.
You can see all the photos of the step by step in the next album.