Info.
- Easy
- 25 minutes
- For 8 people
- 0.8 € / person
- 289kcal per 100g.
How to make Oreo and chocolate cake.
Attention lovers of Oreo cookies and cheesecakes because today’s recipe is made for you and you are going to want to make it immediately.
It is the Oreo and chocolate cake so sweet that you are going to want to eat it whole and without sharing.
It is very simple to prepare and does not require an oven , a point to keep in mind in hot weather or for kitchens that do not have this appliance at home.
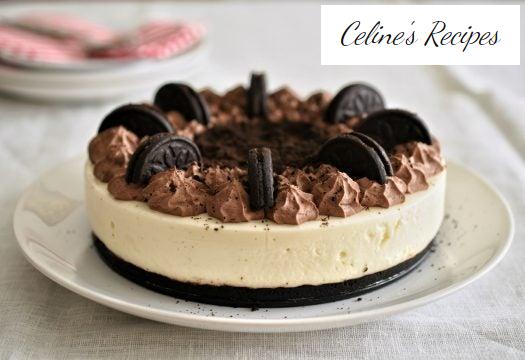
Delicious, very fresh, fresh from the fridge. The decoration can be adapted to suit everyone’s taste. We have come up and prepared a quick truffle to finish it off, because we have taken it as a dessert for a family celebration. But it can be served without decorating or simply sprinkled with crushed Oreo cookies on the surface.
The only drawback of this Oreo and chocolate cake is that it requires an essential resting time during which it takes on body and gels. So you have to be patient.
After the initial 20 minutes of preparation, you must let it cool to room temperature and then put in the fridge. To avoid thinking about it, we can take the opportunity to take a good walk, shop, read, continue cooking or whatever.
It is important to organize the times. That to have it ready at mealtime, as dessert, it will have to be prepared early. Or, even better, make it the night before and leave it in the fridge until consuming. How are you going to do it?
Basic preparation of the Oreo cake
- We begin by preparing the base of the cake and, for this, we open the cookies and remove the filling.
- We save the latter to add to the main mixture and crush the cookies.
- They must be well ground, so better if we use a kitchen robot, although we can also put them in a plastic bag and work with a rolling pin.
- Semi melt the butter and add it to the crushed cookies.
- Mix well until obtaining a homogeneous mass and cover with it the base of a 20 cm mold-free mold.
- We use the back of a spoon to press well and distribute the base evenly over the base of the mold.
- We keep in the fridge while we continue with the preparation of the cake.
Preparation of the cream of the Oreo cake and chocolate
- We heat the liquid cream in a saucepan together with 150 ml of milk, the cheese, the sugar and the cream of the cookies that we have reserved.
- We leave the heat low and, meanwhile, prepare the curd.
- We heat the remaining 150 ml of milk and dilute the powdered curd sachets in it .
- Stir well until there are no lumps.
- Pour the curd mixture into the saucepan we have on the fire and stir constantly so that it does not catch on the bottom and / or burns until it starts to boil.
- Remove from the heat and pour over the pan with the base of the cake. We do it very carefully and slowly, dropping the mixture on a spoon so that the base of the cake does not deform.
- Let the cake cool to room temperature before putting it in the fridge.
- From this moment on, all that remains is to wait for the mixture to set and gelatinize.
- In total it requires about three hours, but it is much better that we spend the rest time and go safely, so we can leave it overnight.
Decoration of the Oreo and chocolate cake. Final presentation
- When the time comes to serve the cake we decorate it to taste.
- In our case we have prepared a quick truffle and, for this, whipped the cream to mount, very cold, with electric rods (you can also use manuals or a robot).
- Add the cocoa powder when the cream is semi-assembled and stir gently before beating again to give the desired consistency.
- We pass the truffle to a pastry bag and decorate to taste.
- We also use some cookies broken by the mitas and more crushed cookies to complete the decoration.
As always, at the end of the entry you have the photos of the step by step. Do not miss any detail of this recipe for Oreo and chocolate cake .
Tips for a perfect Oreo and chocolate cake
- In order to completely remove the mold from the cake, we recommend covering the base of the pan with vegetable paper. This will make the process easier. Otherwise do not bother because the base is stuck to the mold and we could end up destroying the cake.
- It is important that no lumps remain in the curd mix. We can use electric rods and / or pass the mixture through a fine strainer when incorporating the saucepan with the rest of the filling.
- Very important that the filling mixture comes to a boil. This step is not negotiable.
- With these amounts we get about 8-10 very decent servings. In case you need to make the cake for more, you will not only have to increase the ingredients according to the number of servings you want to obtain but also the size of the mold to use.