Info.
- Easy
- 55 minutes
- For 6 people
- 0.4 € / person
- 265kcal per 100g.
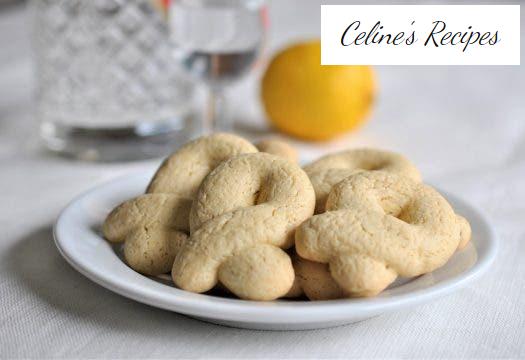
How to make roscon or rosquetes from Cádiz.
The Semana Santa in Spain is a festival of traditional sweet of these dates, such as French toast , traditional Easter cake , the fritters , the fried milk , delicious fritters and more.
Some of them better known than others, but all absolutely delicious. Within the second group, the lesser-known Easter sweets are the roscos or rosquetes from Cádiz .
It is what has to be a local elaboration, typical of Cádiz (as you may have deduced), but here we are to remedy the matter. We have to say that we have recently discovered them and have fallen at their feet.
These roscos or rosquetes from Cádiz are a dessert that tastes of the past, in the kitchen of our grandmothers, and that has elegantly endured the passing of time and fashions, being found today in many patisseries in the south of our country.
In its preparation, only a handful of basic ingredients are needed: flour, egg, anise, sugar, lemon, cinnamon and good oil, and our hands.
No strange and impossible utensils, it is not even a frying pan because these donuts are cooked in the oven. Something to be thankful for, as they are lighter than the fried donuts whose dough is very similar to this.
We encourage you to make them today, as you surely have all the ingredients on hand, and to enjoy them with coffee after dinner, at snack time or tomorrow for breakfast.
Preparation of the dough of the Roscos or Rosquetes of Cádiz
- Peel half of the lemon, trying not to take any of the white part so that it does not become bitter, and place it in a small frying pan along with the oil.
- We bring the pan to the fire and heat the oil. When it starts to sizzle we put out the fire.
- We remove the pan and discard the lemon peel. This small gesture is enough for the oil to flavor.
- Next, add the anise seeds to the hot oil and leave to infuse for approximately a quarter of an hour, while the oil is tempered.
- Meanwhile, in a wide and deep container, beat the egg and sugar.
- We just want to mix, so it doesn’t have to be electric rods or anything like that.
- Grate the other half of the lemon and add it to the previous mixture along with the ground cinnamon. We remove again to incorporate.
- Then we add the infused and tempered extra virgin olive oil and the wheat flour.
- Stir with a wooden spoon or similar before transferring to a clean work surface and kneading for approximately one minute.
Rest of the dough. Donut Shape. Baking and final presentation
- When we have a homogeneous mass, we wrap it in plastic wrap and let it rest in the fridge for 30 minutes.
- After the resting time, we take small portions of the dough and roll them on the table or in the palms of our hands to form cylinders.
- We preheat the oven to 180º C.
- We roll up each cylinder and squeeze the ends to ensure they don’t open during baking.
- We place the donuts on a baking tray covered with parchment paper or a silicone sheet and cook them in the oven.
- Bake at 180ºC with conventional heat up and down, for about 8-10 minutes.
- We remove them before they begin to brown and let them cool on the same baking sheet. We serve to taste.
You can see all the photos of the step by step recipe of roscos or rosquetes from Cádiz in this album. Do not miss any detail and you will get some donuts from Cádiz.
Tips for some delicious Cadiz Roscos or Rosquetes
- They last a long time in good condition, although we have not had time to check how many days because every time we have done them … they have flown!
- It is important not to let the donuts brown, they are a sweet with a whitish appearance. Although if we go through the oven time, nothing will happen either. They will simply be tougher, but equally rich.
- The roscos or rosquetes of Cádiz are not tender, they acquire consistency when cooled and are very crisp. That is why it is convenient not to make them very thick.
- The dough is slightly sticky and no more flour should be added. With the half hour rest it becomes more manageable. However, we can grease our hands to facilitate the task of portioning the dough and shaping them.
- They last many days in an airtight container, although we doubt that you will ever know the exact time because they fly out of the kitchen by magic. And they are yummy.