Info.
- Easy
- 60 minutes
- For 8 people
- 0.5 € / person
- 290kcal per 100g.
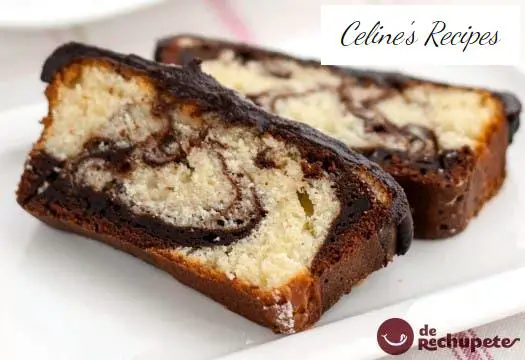
How to make a marble cake I present you a homemade sweet recipe that you will surely like.
One of the most classic brownies that we can find, along with the yogurt and the orange quatre quarts or a very similar one, the bicolor cake .
It is nothing more than a typical sponge cake prepared with two doughs, one with vanilla and the other with cocoa, which are mixed giving, when cut, a veined effect . This cake has always seemed very colorful to me, ideal to surprise your guests in a makeshift cafe.
You can easily find it in supermarkets although I assure you that this recipe is much fluffier. It has much less calories and of course, it is homemade. I think I convinced you, right?
Despite the denseness of the dough with which we have to work, it is a sponge cake with a super light and juicy texture, rather hard, but neither dry nor greasy.
I am sure that this cake will surprise you and will be a recurring dessert in your homes, you will tell me. Guten Appetit!
Preparation of the base of the marble cake
- In a bowl we mix the flour, the chemical yeast and the pinch of salt. We reserve. In another large bowl, add the butter in the ointment with the white sugar.
- We beat for 2-3 minutes, until the mixture increases in volume and becomes whiter.
- Add the eggs to the butter bowl. We incorporate them one by one, beating well until integrating before adding the following. At this point we are going to incorporate the flour and yogurt alternately.
- First add 1/3 of the flour to the bowl, stir and integrate, add half the yogurt and mix well. Then another third of flour, the rest of the yogurt and the last third of flour, mixing well in each addition.
- We separate 1/3 of the dough for another bowl. This part will be the one that we are going to combine with the cocoa.
- Mix the cocoa with the boiling water and stir well until everything is integrated, like a chocolate cream.
- Add the cocoa powder to 1/3 of the mass that we have separated and incorporate well.
- We spread our mold with butter over the entire surface and sprinkle with flour.
- We are going to place the masses so that they fit us like a chessboard. For this, due to the consistency of this dough, it is best to help us with a spoon.
- In the first layer we start alternating colors starting, for example, with the white mass, and in the second we continue starting with the black.
- With a fork, slightly remove the dough, passing it over the entire surface of the cake. From top to bottom and from left to right.
- It is not necessary that we insist too much on mixing the two masses, with 2 or 3 passes with the fork it will be enough for the masses to mix lightly.
- We preheat the oven 10 minutes before putting the marble cake in it, at 175º C.
Baking the marble cake
- Bake our cake at 175º C for 40 minutes on the central tray with heat up and down.
- As each oven is a world, the trick of pricking with a stick can also help you, if it comes out clean it will be ready.
- We remove the mold from the oven and let it rest for 10 minutes on a rack without unmolding. After 10 minutes, remove from the mold and leave it on the rack until it cools completely.
Chocolate topping and final presentation of the marble cake
- When the cake is already cold we begin to prepare the coverage .
- Melt the chocolate in a bain-marie. If you do not have a specific container for it you can do it perfectly with two pots. One a little smaller than the other.
- What we do is add water to the largest pot and put the smallest pot inside.
- It is not necessary for the water to touch the upper casserole or for it to be submerged inside. If you do not have casseroles that adapt, well, nothing, in a saucepan of a lifetime and that’s it.
- When the chocolate is melted we remove it from the heat, add the butter and stir.
- With the residual heat of the chocolate the butter will integrate perfectly.
- When the butter is incorporated, add the cream and mix well. We pour our chocolate cream on the cake and let cool until it solidifies.
We already have one of the funniest cakes we can find. It is not only original and your guests will freak out, it is also delicious.
You can see all the step by step photos of this marble chocolate cake recipe in this album. Do not miss any detail and it will be delicious
Tips and curiosities about the marble cake
- It also allows multiple adaptations since we can flavor them with orange, lemon, coffee or any liquor. I have added the chocolate coating that gives it a sweet and more chocolate touch, but I assure you that by itself the cake is already very good.
- The quantities that I indicate are for a small mold of about 22 x 13 cm. If you want to use a bigger one, simply adapt the quantities and that’s it.
- Surely some of you already know this cake, whose name derives from ” Marmorkuchen ” and is known as a marble, marbled or marble cake cake .
- The idea of marbling two mixes of different colors into one dessert originated in 19th century Germany, then spread to America with German immigrants before the Civil War.
- This sponge cake is of Jewish origin, the first recipe for American Marble Cake appeared in a Jewish cookbook “ Aunt Babette’s Cook Book: Foreign and Domestic Receipts for the Household ”, published in 1889.
- The original recipe included molasses and a combination of spices, which were replaced a few years later by chocolate.
- Gil Marks tells us in the ” Encyclopedia of Jewish Food ” that ” many Jewish bakeries in the New York area in the 1950s through the 1970s added a small amount of almond extract to the chocolate marble cake, creating a version sometimes referred to as a ‘German marble cake,’ which had a characteristic almond aroma. ”Simply delicious, right?