
Info.
- Easy
- 25 minutes
- For 4 people
- 0.6 € / person
- 305kcal per 100g.
Do you remember the chocolate Dalkys or the Danone glasses? How can you raise your hand when you were your favorite dessert when you were little?
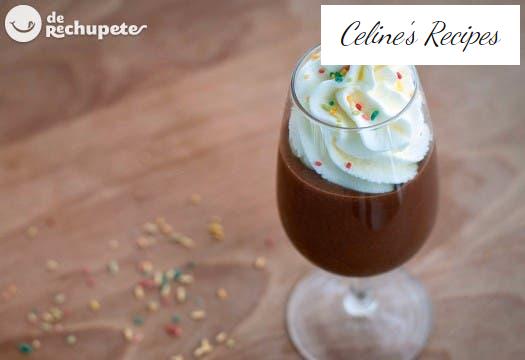
This dessert made time, surely many of you remember the legendary glass of chocolate and cream of all life , with its layer of chocolate and another of cream on top, clearly differentiated.
It is a dessert that triumphs at home whenever I do it, it is delicious. I usually prepare this cup at home for a snack . I admit that it is among my favorites, I do not know if because of the nostalgia of this dairy dessert, it clearly reminds me of my childhood, or how really good it is.
Also when preparing it, you know what your children really eat. Actually it is a very easy recipe, it consists of a traditional chocolate cream in a layer, topped with whipped cream and sweetened to taste.
The question lies only in deciding the sugar point, higher or lower, depending on the tastes of each, the largest amount of chocolate or the type thereof, whether it is 70% cocoa, 50% chocolate or milk chocolate.
In all cases we can enjoy a sweet and delicious dessert for both children and adults. Now you can do them at home in less than 25 minutes. Of course, you must have patience to cool and that will allow us to satisfy the cravings of the most demanding, a delicious dessert.
Preparation of chocolate cream
- In a saucepan mix the milk well with the cornstarch, stirring well until it has been diluted.
- Add the sugar and the cinnamon stick and put on the fire until the mixture thickens, taking care that it does not boil.
- Remove the saucepan from the heat and remove the cinnamon stick from the mixture.
- Add the chopped chocolate and butter and stir until melted, always out of the fire.
- We work the cream beating it without until to get a fine and shiny texture. We pour the chocolate cream in the glasses that we choose for their presentation and reserve until they cool to room temperature.
Preparation of whipped cream
- While the chocolate cream is tempered we prepare the cream. For this we assemble the cream (35% fat), remember that the cream must be in the fridge a few hours before assembling it so that it is very cold. Use a stick mixer and start at the minimum speed. You can see the video above so as not to lose any detail of the process.
- Once assembled we add the sugar and continue beating until it is well integrated.
- We fill a pastry bag with a star nozzle, with whipped cream and sugar and fill each of the cups over the chocolate cream.
- We have to be very careful with the fact that the chocolate cream has to be cold before adding the cream to the top. If we do not have a pastry bag we can use a plastic bag to cut one of its tips.
Assembly of the cups and final presentation
- In this case I used glasses because I wanted 4 hearty desserts, more chocolate and more cream. Although if you use lower and wider glass cups, you can have more units of less quantity.
- These cups of homemade chocolate and cream should be eaten very cold, never leave them at room temperature.
- We can decorate our glasses with what we like best, I have put some colored shavings but we could decorate them with conguitos, lacasitos, M & M, s, chocolate shavings or simply without any decorations.
It is a real pleasure to put the spoon to the bottom and eat the chocolate cream and whipped cream together. You will notice that you are immediately transported to your childhood, although the effect only lasts as long as it takes you to eat the glass, as in the advertisement, in which the spoon looks for the remains in the glass cup.
This dessert is as good as it is easy to prepare. The classics never fail, that’s why the traditional glass of chocolate with cream is always a safe bet with which to please both adults and children at home. Do you dare to surprise your children with these cups?
You can see all the photos of the step by step in the next album.