
Info.
- Half
- 60 minutes
- For 10 people
- 0.5 € / person
- 302kcal per 100g.
How to make some Christmas cookies . One of the clear memories of Christmas since I was a child is the moment when my mother told us that the time had come to put up the Christmas tree.
On December 1 the countdown began and the departure signal for the day of kings was the fact that the Christmas tree with all its decorations and figurines appeared in our room so that we could spend an afternoon entertaining decorating it.
This year I am ready to surprise at home, so I have put together two of my passions, the kitchen and my Christmas tree moment, which continues to exist, preparing some homemade Christmas cookies that we have decorated to hang among the rest of Christmas decorations.
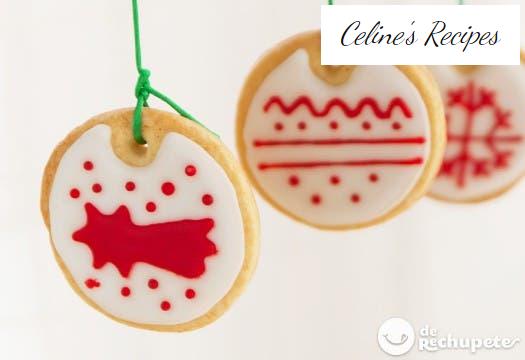
I have to say that, in addition to having a pipe painting them, these cookies are vice. They are super rich butter cookies, which are also perfect to decorate since they deform almost nothing in the baking and last for many days.
On the blog you can find various types of Christmas cookies , they are a small summary of several years preparing cookies to give away this holiday season. I have prepared bags with homemade Christmas cookies and I assure you that this recipe will become a top of my cookie gifts, because they are incredible in flavor and are very crispy.
Whether it is to hang from the Christmas tree, to give as a gift or simply for the sake of preparing some very nice cookies, I encourage you to get down to work, I am convinced that you will like them.
Preparation of decorated Christmas cookies
- In a bowl, and with the butter with the ointment texture, soft, beat the butter with the sugar until a cream is formed. Add the whole egg, a pinch of salt and the vanilla essence and continue mixing until we have a homogeneous cream.
- Add the flour and start mixing, first with a fork, until crumbs form, and then with your hands until you can form a compact ball.
- We place the dough on a transparent plastic paper so that we have a flattened ball and wrap with the paper. We keep the dough in the fridge until it has reached hardness, for about 2 hours.
- When the dough is hard, we take a portion and keep the rest in the fridge until it is time to use it. We place the dough between two oven papers.
- Between two sticks of 5-6 mm. diameter that we will use as a guide to get the thickness of the cookies. We pass the roller until it is stretched. We can get these sticks in confectionery stores.
- With the chosen cutter we cut the cookies and keep them in the fridge until they harden again. If we do not have cutters we can use a glass to shape the cookies.
Baking Christmas cookies
- We preheat the oven and bake the cookies by placing them on a cookie sheet. It is not necessary to grease it or put any sulfurized paper, the cookies will not stick to us.
- We cook the cookies at 180ºC for about 12 minutes, depending on the size of the cookies.
- We continue with the rest of the dough and the dough cuts that we have created.
- We have to keep in mind that we must manipulate the dough as little as possible, thus avoiding them to deform in the baking.
- We remove the cookies from the oven and let them cool on a rack before decorating.
Preparation of the icing for decoration
- Once we have the cold cookies we prepare the icing for the decoration. In a bowl, beat the egg whites for a few seconds, only until they begin to foam.
- We can use pasteurized whites instead of fresh ones without problem. We incorporate 80% of the glass sugar and with a fork we begin to mix until we have a cream. Add the vinegar droplets and continue stirring.
- At this moment is when we have to decide if we add all the rest of the icing sugar or only part, we have to get a quite dense toothpaste texture. This icing, with this texture is the one that we will use to make the edge of our decoration and will serve as containment for the filling.
- The sugar we use is icing sugar, it is not worth using ground sugar, since icing sugar has starches among its ingredients that will give it consistency.
- We set aside 20% of this icing for a small container and add water to the rest, drop by drop, until we get a texture of carpenter’s glue, dense but moving.
- If we want to use some color we will add it at this time, with a little point it will be enough. We stir slightly until it is integrated with the icing and store each of our icing in separate bottles.
Decorating and preserving Christmas cookies
- These bottles must be suitable for this purpose, from which a nozzle of the desired size can be adapted. In our case we will use a finite nozzle, No. 2 for the edges, and a thicker one to fill.
- Decorate the cookies starting at the edges of all and wait until it dries, about 10 15 minutes. Then we go to the filling and let the cookie dry, if possible from one day to the next before proceeding with the rest of the decoration.
- If we keep the cookies in an airtight place they will keep for several days, that is if nobody eats them before. They are perfect to decorate the tree, some edible Christmas balls and very cool.
Be sure to enjoy all these homemade Christmas cookies that we have in our dessert recipes and in the special Christmas recipes .
You can see all the photos of this cookie recipe step by step in the next album.