Info.
- Half
- 120 minutes
- For 1 people
- € 2.95 / person
- 390kcal per 100g.
Homemade Easter Eggs Recipe .
In my land what is typical, what is in my memory, is that at Easter , normally at Easter, the godparents give their godchildren a detail, before it was bread , a donut or roscón , although nowadays it is usually given a chocolate Easter egg .
For me it was a special moment, I waited patiently for them to come home with the longed for trophy, the bigger the better, to open it without waste of time and put on my chocolate boots, and discover in passing the surprise inside.
I had to try to make this Easter dessert so traditional at home and thus give it to my goddaughter Carmen, I hope it will give her the same illusion that I did.
The truth is that I was always curious about the process, how can something be made with chocolate and be hollow, so smooth and shiny …
In reality the technique could not be simpler, although I am not going to fool you, its preparation takes a long time due to the repeated processes of smearing in the mold and cooling of the chocolate.
If you make them for yourself, choose the chocolate that you like the most, just delicious. Happy Easter day everyone! Especially my goddaughter Carmen !
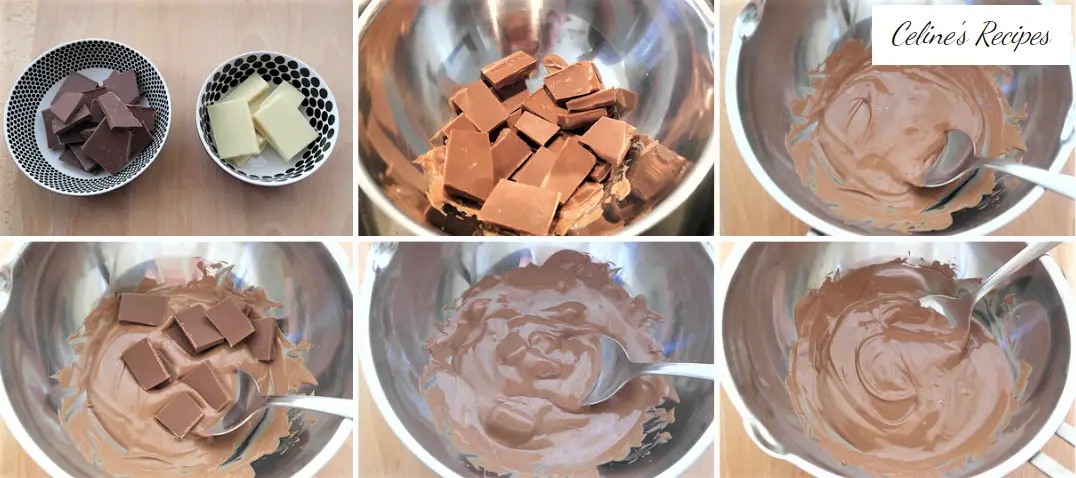
Before starting with Easter eggs. The chocolate
- Chop the milk chocolate and melt in two-thirds of the total, about 100 g.
- The ideal is that you have a specific saucepan for bain marie, but if not with two saucepans (one inside the other) you can melt it perfectly.
- We put water to heat in a saucepan and when it begins to boil we put the saucepan on top where we will have our milk chocolate.
- The best thing is that the chocolate gradually melts, so it is preferable that the saucepan with the chocolate does not stay in the boiling water.
- If necessary, we hold it by hand in the air so that the heat it receives is only that of water vapor, do not worry, the process will be very fast. We are constantly stirring until all the chocolate has dissolved.
- Remove the saucepan with the melted chocolate from the heat and add the 50 g. milk chocolate that we set aside.
- With the residual heat of the chocolate already melted, and without stopping stirring, the new chocolate that we have added will melt.
- If you use cover chocolate this will be the technique to use so that you have a shiny chocolate. To start working with it, the chocolate will be almost cold, at around 30º C.

Easter egg modeling. Chilled Egg Parts
- We support our Easter egg mold on two supports and with a kitchen brush we paint with chocolate the entire surface of both cavities.
- Initially, the entire surface will not be completely covered with the chocolate, we will continue to see through it. It will be in the subsequent passes when the egg will be completely covered.
- We keep the mold in the fridge for 15 minutes until the chocolate hardens before repeating the operation.
- It will take no less than three passes to get the egg well covered and 4-5 millimeters thick.
- It is important to especially insist on the edges of each half smearing the chocolate since it is the area of the union with the other half of the egg, and therefore, the weakest point.
- It can happen to you that between past times, the chocolate has already hardened and it is not worth spreading.
- What we will do is put the saucepan for 10 seconds over the steam of the water that we have boiled in a saucepan. We remove and stir until it melts again. You will be able to work with him again.
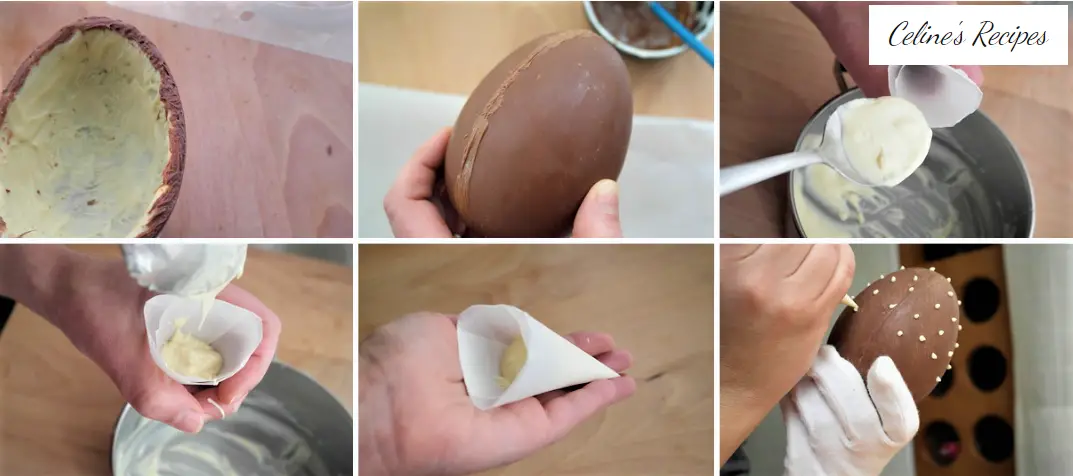
- We repeat the process with the white chocolate, we melt it. When it is almost cold, spread it on each of the egg halves, repeating the process three times.
- We store in it, frigo this time upside down, with the part of the chocolate hidden. When the chocolate is fully solidified it will come off the mold on its own.

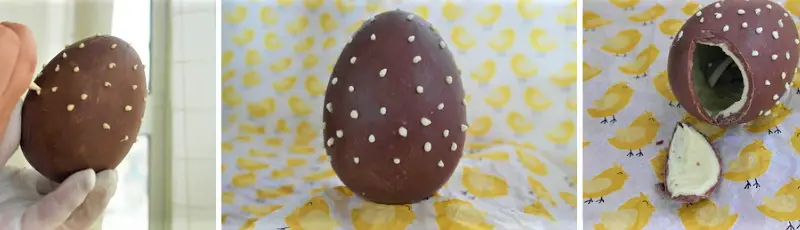
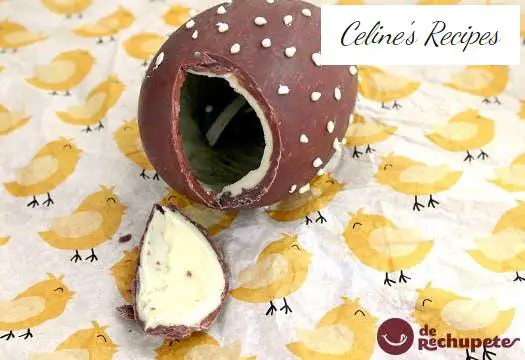
Union and decoration. Final preparation of the chocolate Easter egg
- When the last layer of chocolate is completely hard. We scrape the edges of each half with a knife to make them as smooth as possible.
- This will be the joint surface of both halves so it is important that they are very even so that they fit well. Remember that if you want to add a surprise, this is the moment, before closing the two halves of the egg.
- We return to heat slightly the milk chocolate that we have left and with a fine brush we paint the edges and we join both halves.
- We review possible imperfections that we may have left and store again in the fridge until it hardens.
- Once it is completely hard we can scrape off any remains with the blade of a knife and be very careful, we will have it ready and perfect to give away.
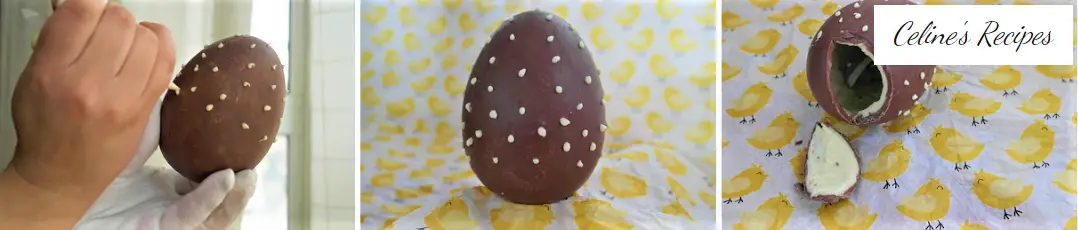
- To decorate the egg with chocolate, reheat the remaining white chocolate.
- We put it in a paper cone that will make us an improvised mini pastry bag.
- We make the decoration that we like the most, we let it cool and ready. You will see the happy face of your godchildren, Enjoy it all!
You can see all the step by step photos of the recipe for homemade chocolate eggs in this album.
Tips for some yummy chocolate eggs
- The work with chocolate has an added difficulty because that is smooth and glossy hard surface.
- It is necessary to temper it, and for it to be well tempered it is necessary to use cover chocolate. This chocolate has a higher cocoa butter content than traditional chocolate tablets. It is a special chocolate for pastries and chocolates.
- The tempering process is a set of temperatures that recrystallizes the crystals of the cocoa butter.
- We melt the milk chocolate until it reaches a temperature of around 40-45º C and then we lower it to around 30-31º C.
- To achieve this we melt only part of the chocolate to 40-45º C and remove from the heat. Add the rest of the chocolate in a second batch, allowing it to melt with the residual heat. Thus we manage to lower the temperature that must reach 30-31º C, ready to work with it.
- I have used regular milk chocolate and filled it with white chocolate, like the famous Kinder eggs .
- The result would be more lucid if we use chocolate with a high percentage of cocoa-type cocoa.