Info.
- Hard
- 60 minutes
- For 10 people
- 0.6 € / person
- 355kcal per 100g.
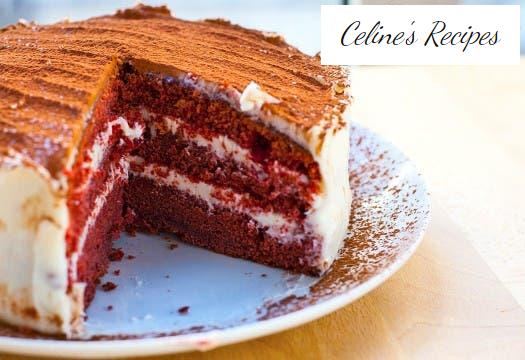
How to make Red Velvet Cake or Red Velvet. You can not complain, Valentine is coming and I am giving you a lot of ideas to look better than good.
It is true that it is a purely commercial date designed only to consume, remember that ” love is demonstrated every day and not only on a specific date . ” But since that day you do not give something to your wife or girlfriend … surely the thing does not end very well. What better than to enter the kitchen and prepare a special breakfast, a meal not to forget or a heart attack dinner.
Today’s recipe is an idea for dessert, a cake that has always caught my attention, a deep red and velvety sponge cake called Red Velvet . It is a layered cake, which is traditionally accompanied with butter or cheese icing between its layers and as an exterior decoration.
Doing a little research on where it might be from I find that it has a confused origin. It is said that around the 1950s in New York it was on the dessert menu of the Waldorf Astoria Hotel . When a customer impressed by the taste of this cake asked for the recipe, the chef kindly gave it to her, in addition to adding to her account the exorbitant cost of the famous cake’s formula. The indignant client decided to make it public with the intention of making it popular, thus exposing one of the hallmarks of the famous hotel.
In Canada it was a well-known dessert in the restaurants of the Eaton chain around the 1940s and 1950s. Its owner, Mrs. Eaton, made believe that the cake was her invention, surrounding it with mystery, forcing her employees to keep silence on the ingredients and the preparation of this cake.
There is another version that seems to me the most credible, which assures that it was in the rationing period during the Second World War, when necessity forced bakers to use cooked beet juice to improve the appearance of their cakes, this being the origin of the Red Velvet . In any case, this recipe saw its popularity relaunched in 1989 thanks to the movie Magnolias de Acero that featured a Red Velvet wedding cake in the shape of an armadillo .
Currently, all recipes use red dye to give it its tone, but we must also take into account that the reaction between the acid of the vinegar and the buttermilk’s whey tends to make the anthocyanin red appear in the cocoa, also keeping the cake moist, soft and fluffy.
Among all the ingredients, the one that perhaps calls our attention a little because it is unusual in Spanish gastronomy is buttermilk . It is nothing but buttermilk , a dairy product widely used in baking in the US and Europe. I hope you like it and cheer up with this recipe.
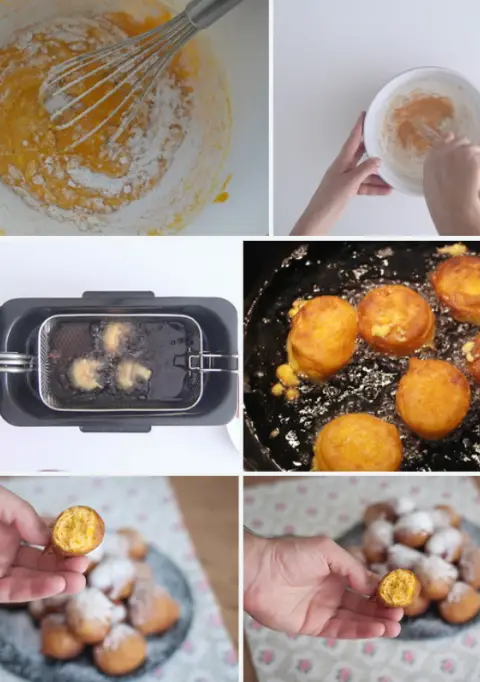
Preparation of the cake and base of the Red Velvet
- If we don’t have buttermilk the first thing we will do is prepare it. We put 250 ml. of whole milk in a bowl and add a splash of lemon juice.
- Let it sit for at least 15 minutes. After this time it will seem as if the milk has been cut, at that moment it would be perfect.
- In a bowl we sift the flour, the bicarbonate, the salt, the yeast and the cocoa. We reserve.
- In another bowl we mix the buttermilk , the vinegar, the red food coloring and the vanilla essence. In a third bowl beat the butter with the sugar until making a cream.
- We incorporate the eggs one by one, beating well each time. We alternately add the contents of the solid and liquid bowls to this mixture four and three times, starting with the flour.
- Butter the mold that we are going to use. We pour the mix into the mold.
Baking the Red Velvet cake
- We preheat the oven to 180º C.
- Bake at 175º C for 30 minutes. In the central position of the oven, with heat up and down.
- As each oven works in a different way, I recommend you keep an eye on it and that you try to prick the cake with a stick. When you think it can be, if the stick comes out dry it will be ready.
- If what we have planned is to make a layer cake filled with cream. Surely it will be easier for us to bake the cake in several molds instead of just one. This will save us the work of cutting the layers. Although we always have the alternative of not layering and decorating it with icing sugar.
- We remove the mold from the oven and let it cool on a rack without unmolding for 10 minutes. Once tempered we can turn it around and remove it from the mold without difficulty.
- The ideal is to prepare this cake a day in advance if the intention is to weather it and fill it with cream. Once the cake is cold we wrap it in plastic wrap. We keep it in the fridge until the next day.
- This way we get the cake to settle its crumb. This will make it easier to handle, both for cutting and for mounting the cake.
Cheese glaze preparation and final decoration
- To prepare this topping, the butter and cheese need to be at room temperature. First beat the butter with the sugar until a whitish cream has been created.
- We add the cheese and the vanilla aroma and beat with a stick mixer, mixing well.
- We cut the cake with a serrated knife into as many layers as we want.
- With a spatula we are alternately placing a layer of sponge cake and another of cream cheese. Until finishing with the last layer of sponge cake.
- We ended up decorating the cake with cream cheese.
It is a little laborious to do but the end result is impressive. I assure you that your guests will freak out in red colors! The cake is also quite cheap, it gives for about 15 servings at € 0.40 / person.