
Info.
- Easy
- 60 minutes
- For 10 people
- 0.4 € / person
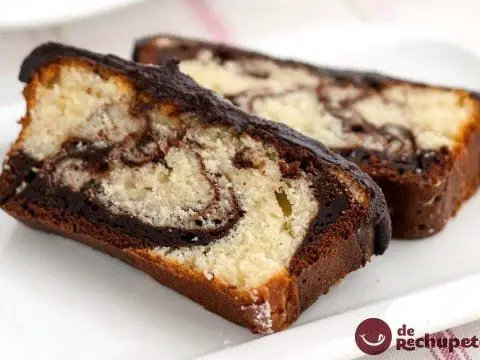
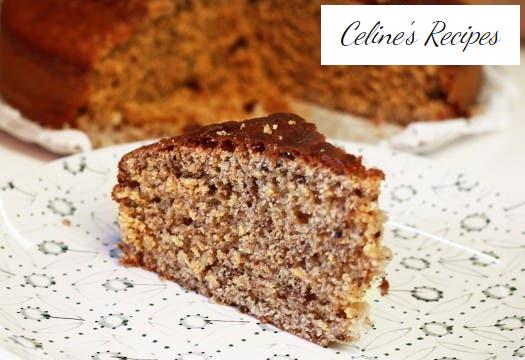
This hazelnut sponge cake was prepared by Eli, well it was actually a gift for Jimena, who is passionate about hazelnuts. He liked it so much that I have prepared it at home 2 times already. The hazelnuts make the dough of this cake have a very tasty density with a granule that reminds of nougat. In addition Eli has given us a lot of hazelnuts that she herself has collected in the hazelnuts that her mother Elisa has in Ponteareas, with a small size but that are full of flavor. I recommend that you prepare the sponge cake with hazelnut from the country, which although less attractive on the outside, has no comparison in flavor.
Also if you are tired of those sponge cakes, this hazelnut dessert will assure you that it will be very fluffy, with a tender and tasty crumb, ideal for an energetic breakfast. You can even adapt it to the tastes of your home with other nuts, even mix them. I often think that we use hazelnut a little in our pastries, and at home, I assure you it is one of our favorite nuts, they manage to fill any sweet or dessert with flavor.
With the tips that you are going to read in this recipe, you will get this homemade hazelnut cake to be fluffy and with a lot of hazelnut flavor. This sponge cake is perfect for dipping in milk, chocolate or coffee as it is quickly soaked in the liquid. In addition, hazelnuts give it a delicious flavor that combines very well with chocolate. It is one of those dessert recipes that can be taken at any time of the day, a good option as a homemade dessert with an unmistakable flavor of hazelnuts that make it an unusual cake. Simply exquisite! Do you want to see how it is done?
Preparation of the hazelnut cake
- We split the hazelnuts to remove the hard shell that covers them. For this, we can use a nutcracker or hit them carefully with a hammer or some other utensil, always placing a cutting board underneath so as not to damage the surface where we are working.
- Once we have all the hazelnuts, we must place them already in the oven tray and preheat it to about 180º C. It is important that the nuts are not piled up, but well spread so that they can all be roasted equally. In case you want to toast a significant amount of hazelnuts, we recommend that you do it in turns and not all at once.
- By the time the oven has reached the desired temperature, you can put the tray in and let the hazelnuts roast for about 15 minutes. After this time, open the oven and very carefully move the tray slightly to turn them and put them in the oven for another 5 minutes.
- We take them out of the oven and let them cool, once they are warm you can remove the thin brown shell that covers the hazelnuts without problem. We crush the hazelnuts in the chopper until it has a consistency of flour, but a little more grainy.
- In a large bowl we put the milk (better that it is whole) and add the juice of the half lemon, stir and wait about five or ten minutes for the milk to cut. We reserve.
- We beat the eggs with the sugar until a small foam comes out and when they are already we will add the milk. Mix the yeast with the flour and put it in the previous bowl, beat again. Let stand 10 minutes.
- In the same bowl we add the zest of half a lemon, the vanilla essence, a pinch of salt and the liquid butter. We beat everything until there are no lumps. Finally we add the hazelnuts and mix with cream with the help of manual rods or a fork.
- We pour the previous mixture in a container greased with butter.
- The oven must be turned on long enough for it to reach the ideal temperature, about 10 minutes depending on the oven and the temperature that is needed, we will preheat it to 190º C. The baking time logically varies depending on the thickness and size that the mold will give us that we use .
- We bake it at 180º C for about 45 minutes with heat above and below, on the rack that is halfway up so that the heat is uniform, so the base will not overheat. If you don’t have a grid use the tray. We should not open the oven until the cake is well raised and golden.
- If you want, before baking you can sprinkle some hazelnuts on top of the cake, but you must be careful that they do not burn during baking. If anything, cover the mold with a sheet of aluminum foil.
- Once out of the oven, be careful not to burn yourself. Let the mold warm up a bit, shake it gently to help it separate from the walls, remove it from the mold and put it on a rack to cool. Once the cake is completely cold we can put it on a plate or tray and put it in a bag suitable for food, taking care that it is tightly closed to keep it for more days and that it does not stay dry. It is perfect for breakfast or to take to work.
This hazelnut sponge cake has a moist texture and a very special flavor. It is very easy to prepare and I assure you that you will have guaranteed success with your guests or why not, a very special snack for the family. If you like it as much as we do, you will finish it quickly. Delicious!
Surely this carousel of step-by-step photos of how to toast hazelnuts is a great help so that your hazelnut cake looks great on you.