Info.
- Easy
- 35 minutes
- For 4 people
- 1.2 € / person
- 305kcal per 100g.
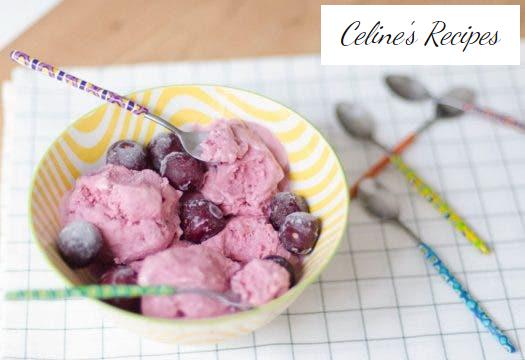
How to make a cherry ice cream. Preparing ice cream at home marks a before and after in the evaluation of ice cream that we can have in the summer.
It is true that there are establishments where we can enjoy quality ice cream, made with natural products, but in most cases, they usually leave a lot to be desired.
It is also cherry season and a perfect way to enjoy this fruit in another way. On their own, the Jerte pillory falls one after the other, they are like delicious little chocolates, but imagine this ice cream with all the pillory flavor in your mouth. A creamy, refreshing dessert, where we add less sugar than in a normal ice cream because we bring the role to the fruit.
 You can prepare this ice cream recipe at home with or without a refrigerator. Cook with the little ones at home and let them pit the cherries and stir the mixture. This way they will appreciate these pillory, a fruit full of vitamins. It is a perfect option for a snack for the little ones and not so little these hot days.
Let yourself be seduced by this much healthier dessert recipe than classic ice cream, just as appetizing and fun but with less fat and calories.
Enjoy all the ice creams that we have on the blog, from the delicious chocolate ice cream , the classic vanilla ice cream , the hazelnut ice cream or the one you like the most at home, the nougat ice cream .
Before starting with ice cream. Pickles and cherry syrup
- We wash the pillory well and discourage it. You can see all the tricks we have to remove the cherry pipo in the following video.
- We make the syrup with the indicated water and sugar. In a saucepan or casserole, heat the water with the sugar. Let it cook over medium low heat for about 6-7 minutes. We lower the heat and add the cherries until soft. We are pricking with a fork until we achieve the desired texture.
- In this case it took 12 minutes to get them to my liking, but with less time at a higher temperature you get the same result.
- We turn off the fire and mix well so that they dissolve and reserve. We must let the mixture cool completely and begin to thicken before using it, so it is advisable to do it in time.
- You will see that we have a fairly compact fruit base. Take out of it as 20% to add it at the end of the process and show the pieces of pillory. The rest we crush lightly until we get a homogeneous mixture. We reserve.
Preparation of the cherry ice cream base
This ice cream can be made with or without a refrigerator, the difference is minimal because the fat base of the cream and dairy makes it easy to prepare. I explain how to do it in both ways.
- While the cherry cream is cooling, prepare the cream cream.
- For this we mount the cream (35% fat), remember that the cream must be in the fridge a few hours before mounting so that it is very cold.
- We use a stick mixer and start at the minimum speed. You can watch this video to not lose detail of the process.
- We add honey or invert sugar with enveloping movements and add the cream to the cold cherry mix that we have reserved. At the same time we add the condensed milk.
- We remove everything with slow movements to integrate all the ingredients well and that the whipped cream does not come down.
- If you do not have a refrigerator, let the ice cream base cream cool completely before putting it in a container or tupper. We put all the mixture in the fridge. We must leave it there at least three hours before we start working with it.
- If you have a refrigerator and you want to use it in this ice cream, you must store the container in the freezer 24 hours before.
You can see all the photos of the step by step in the next album of the cherry ice cream recipe .
Preparation of cherry ice cream
- If we make the ice cream with a refrigerator, we have to leave the cream for several hours in the fridge, at least 3 hours. Then we will be able to butter. It is a process by which the texture of the ice cream changes from liquid to solid or semi-solid by means of stirring and cold.
- The objective is to turn the cream that we have into a kind of butter. Then we must break the ice crystals through movement and introduce air into the mixture (by means of a refrigerator or manual shake). It is the most important step to achieve a creamy ice cream .
Ice cream preparation manually
- When we make the ice cream without a fridge, my recommendation is to have the cream in the fridge for about three hours.
- Then go to the freezer for another hour of rest, finally we will be another two and a half hours stirring the ice cream in the freezer every so often to break the crystallization.
- To remove it we take it out and transfer the cream to a metal bowl that we have previously had in the fridge. It has to be very cold.
- We beat with some rods to avoid the formation of the crystals, since however much fat the ice cream base has, they can form.
- During the first hour I recommend doing it every ten minutes, then every thirty minutes, and so on about three times. At the end of everything, add the chopped chocolate pieces and then leave it in the freezer until the next day.
Ice cream preparation with refrigerator
- We remove the cream from the fridge and go to the refrigerator that we will have had in the freezer for 24 hours and that will beat the cream with the spatula constantly. Thus air enters the mix, making the crystals smaller and the mix lighter.
- The process will take about 15 to 30 minutes, depending on the quality of the refrigerator. Once we see that the cream begins to butter we add the cherry mixture. Remember, 20% of the chipped cherry cream we have reserved to create rich fruit stumbles in ice cream.
- If we see that it takes time to keep the trick, keep it in the fridge for 15 minutes, put everything in the freezer (ice cream cup) another half an hour, and repeat the process again.
- Once we have the butter mixture, we just have to put it in a tupper and freeze until the next day. To serve the ice cream we remove it from the freezer 10 minutes before so that it softens until we can form the balls.
It is one of the creamiest and tastiest ice creams you have ever tried. A soft and delicate touch of vanilla that make it the best, very good.