
Info.
- Half
- 15 minutes
- For 8 people
- 0.5 € / person
- 325kcal per 100g.
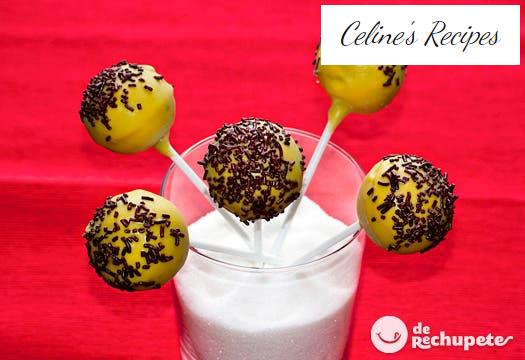
Cake pops are very fashionable in America and have recently swept Spain. Whether temporary or not, it must be recognized that they are very attractive and offer endless possibilities.
the next time you have a dry cake rolling around the house and you don’t know what to do with it, you can use it to make this sweet, it is one of the best recipes for desserts and use.
Cake pops are nothing more than one-bite mini cupcakes with a presentation to die for since you can decorate them with everything your imagination allows. Her main driving force is Angie Dudley, also known as Bakerella .
The word cake pops comes from the English, “cake” which means sponge cake or paste l and ” pops ” which refers to lollipop, that is to say a sponge cake with stick. Other names by which you can find them are bisque balls, biscuits, lollipops, “sweest on sticks”, cake balls (although when we talk about cake balls we refer to biscuit balls without the stick, as if it were a truffle).
They are very easy to prepare, although they require your time. We just need to have the ingredients on hand and a little imagination.
You can find a lot of types of molds on the market to directly cook your own cake in the shape of a ball without the need to use creams to consolidate and shape it.
A way to save time and make it more professional, you always have the traditional way that will surely excite the little ones at home.
Preparation of the dough for the sponge cake
- With the ingredients that I have put about 25 balls of sponge cake, of the type sponge cake.
- Mix the milk with the vanilla extract and reserve. In another bowl we sift the flour, cocoa and yeast, reserve.
- In a bowl beat the sugar with the butter until well integrated and froth.
- Butter and eggs should be at room temperature for at least a couple of hours.
- If, for whatever reason, you use them directly from the fridge, you will see when making the mixture with the butter that it will seem as if it were cut. Don’t worry, the biscuits will come out the same but to achieve maximum fluffiness and the ideal texture, the ideal thing is that both the butter and the eggs are at room temperature.
- To the sugar and butter mixture we add the eggs one by one, stirring little by little.
- We add more or less half of the flour mixture with cocoa and stir.
- We add the milk that we had reserved and stir again. Finally we incorporate the rest of the flour with cocoa and pour the mixture into a special cake pop mold.
Baking and presentation
- The easiest thing would be to use a pastry bag to avoid mistakes, but you can do it perfectly with the help of a couple of spoons, yes, with a good pulse.
- We adapt the lid of the mold and put in the oven previously heated to 190º for 12 minutes. It is not necessary to grease or flour the mold, except in its first use, making it very comfortable.
- After this time we will let the mold rest with the lid on until it cools completely.
- Once cold, remove the lid and we have the biscuit balls ready to decorate.
If you still do not have it clear, I leave you a step by step in photos of this recipe for cake pops so that they come out yes or yes.
Cake pop decoration
- To decorate this type of biscuits, the easiest way is to use Candy Melts , a chocolate prepared to melt in this type of decorations that you can find in confectionery stores and on many web pages.
- It is easy to melt as it does not need tempering and comes in some fantastic colors. Ideal to fill molds without worry, cover and decorate your biscuits and cake pops.
- The advantage of this type of chocolate is that it has a much faster drying, which is beneficial due to the way it works in cake pops.
- In any case, you could use topping from other chocolates but when melted it is much more liquid than Candy Melts, which will cover our balls worse and also take longer to harden.
Preparation of coverage
- We will start preparing the coverage, melting the chocolate.
- We place the candy melts in a small bowl and put it in the microwave at low temperature for about 30 seconds. They are removed, stirred and put back another 30 seconds, and so on until they are melted.
- If we go over temperature or time or do not stir them every time, they will become lumpy and can burn. When in doubt, it is better to put them fewer seconds each time, so as not to take risks.
- It may happen that once melted they are a little thick. It is useless to reheat them, they will no longer melt and we will only manage to burn them.
- The solution is to add sunflower oil (which has less flavor) or butter and stir until the mixture is liquefied.
- We prepare the base for the placement of the sticks in the biscuit balls. To do this, with the help of one of the sticks that we will use later.
- We make a slit of 1.5 or 2 cm, without going over the middle of the ball.
Sponge cake coverage and final presentation
- We dip the stick in the melted chocolate that will act as glue. We put it in the slit we just made and let cool in the fridge for a few minutes.
- Once the sticks are dry on the biscuits. We will be bathing each ball inside the chocolate bowl turning it over, trying to let the excess fall into the bowl.
- When we see that it does not drip we will place it on a support.
- As a support we can use the mold itself or a piece of Porexpan, the green foams that they use in florists or a cup full of sugar, for example.
- As the Candy Melts dry very quickly we will have to have prepared the decoration that we want to put before starting the bath. In this case, chocolate shavings that we will sprinkle right after bathing them in chocolate.
I hope you liked them and that you dare to do them. It’s a lot of fun!